Serverless computing has become increasingly popular in recent years, and AWS Lambda is one of the most
widely used serverless platforms. Spring Boot, on the other hand, is a popular framework for
building microservices and web applications in Java. By combining these two technologies,
developers can create powerful and scalable serverless applications.
In this comprehensive guide, we'll dive into the details of building an AWS Lambda function with Spring Boot 3
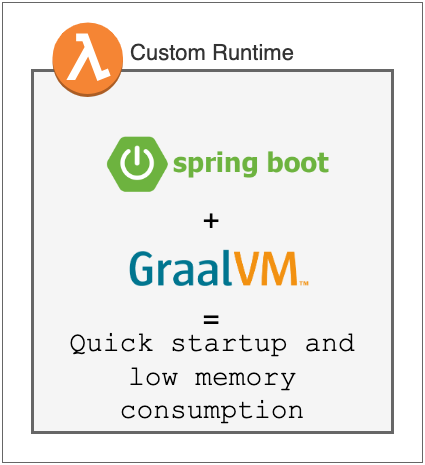
and GraalVM Native Image. We'll explore how to use GraalVM Native Image to create a custom runtime for our
Lambda function, which can result in faster startup times and lower memory usage. Additionally,
we'll cover how to use the AWS Serverless Application Model (SAM) to deploy our Lambda function to AWS,
how to test our function locally, and how to automate the deployment process with GitHub Actions.
By the end of this guide, you'll have a solid understanding of how to build and deploy efficient and scalable serverless applications with Spring Boot and AWS Lambda.
Foreword
This blog post will guide you through the steps of building a production-ready native AWS Lambda function that receives batch messages from an SQS and writes them into a DynamoDB table. It will explain all the details along the way.
AWS Account optional (you may need it if you want to deploy lambda to AWS)
GitHub Repository optional (you may need it if you want to automate deployments to AWS using GitHub Actions workflows)
What is a Native Image, GraalVM, Spring Boot AOT processing, and How Do They Connect?
GraalVM is a universal VM developed by Oracle JDK that is designed to accelerate the execution of applications written in Java and other JVM languages, supporting JVM Runtime Mode, Java on Truffle, and Native Image, with the latter being the focus of this blog post.
GraalVM
The GraalVM native image is a component of GraalVM that ahead-of-time (AOT) compiles Java code into a standalone executable, which can be executed without a JVM. This allows for faster startup times and a lower memory footprint compared to traditional JVM-based applications. Native-Image is particularly useful for serverless and cloud-native applications, where lower startup times and lower memory usage can help reduce resource utilization, improve scalability, and reduce overall costs.
Note: The artifact produced by the GraalVM is platform-dependent, meaning you won't be able to run it on a platform with a different architecture or OS.
There are some minor inconveniences of using GraalVM and assembling standalone executables:
Longer build time (depending on machine and application size, it can take anywhere from ~2 minutes to ~10 minutes)
GraalVM is not directly aware of the dynamic elements of your code and must be hinted about reflection, dynamic proxies, any resources, and serialization. (The Spring Boot plugin will try to do most of the job for you, but sometimes you have to provide hints on your own.)
GraalVM is a relatively new technology, and there may be limited tooling and resources available to help developers debug and troubleshoot issues.
If you're not scared of these inconveniences, let's move forward and try to understand what Spring Ahead-of-Time Processing is and how it simplifies our interaction with native-image assembly.
Spring Ahead-of-Time Processing
Most of us know that the magic hidden behind the scenes of the Spring Framework heavily relies on reflection and Dynamic Proxies. However, this can be a complete nightmare when it comes to building a native executable binary using GraalVM. Fortunately, the Spring Native project (which became part of Spring Boot) pre-processes all dynamically accessed and created classes using Ahead-of-Time Processing.
To explain what AOT Processing does, let's take a look at a class from the lambda that we'll be creating:
This is a simple configuration class that defines a single bean. In a JVM runtime, Spring would create a proxy object for the UseCaseConfig class and attempt to retrieve a bean instance by calling the processNoteRequest method. This method would return either the same instance or a new one based on the bean's scope. When a bean is created, Spring uses reflection to perform dependency injection, call the init method and perform other initialization tasks.
For each method annotated with the @Bean annotation, Spring creates a Bean Definition, which provides instructions on how the bean should be assembled. The configuration class itself also requires a Bean Definition.
To sum up, the configuration above will provide three configuration points during the runtime (❗ keep in mind that all these objects are created during application startup):
A BeanDefinition for the UseCaseConfig class.
A BeanDefinition for the ProcessNoteRequest class.
A proxy on top of the processNoteRequest method that will instantiate this bean.
Now adding the org.springframework.boot plugin from version 3.0.0 and above, add additional steps to our default compilation tasks, which include AOT processing.
After a successful build of the projects the above class will be transformed in the following Java Configuration class(❗ these classes are generated during the build time and later are used by GraalVM to build the final native artifact):
1/** Bean definitions for {@link UseCaseConfig} */ 2publicclassUseCaseConfig__BeanDefinitions{ 3/** Get the bean definition for 'useCaseConfig' */ 4publicstaticBeanDefinitiongetUseCaseConfigBeanDefinition(){ 5Class<?>beanType=UseCaseConfig.class; 6RootBeanDefinitionbeanDefinition=newRootBeanDefinition(beanType); 7ConfigurationClassUtils.initializeConfigurationClass(UseCaseConfig.class); 8beanDefinition.setInstanceSupplier(UseCaseConfig$$SpringCGLIB$$0::new); 9returnbeanDefinition;10}1112/** Get the bean instance supplier for 'processNoteRequest'. */13privatestaticBeanInstanceSupplier<ProcessNoteRequest>getProcessNoteRequestInstanceSupplier(){14returnBeanInstanceSupplier.<ProcessNoteRequest>forFactoryMethod(15UseCaseConfig.class,16"processNoteRequest",17ReadSqsMessageBody.class,18SaveNoteRequest.class)19.withGenerator(20(registeredBean,args)->21registeredBean22.getBeanFactory()23.getBean(UseCaseConfig.class)24.processNoteRequest(args.get(0),args.get(1)));25}2627/** Get the bean definition for 'processNoteRequest' */28publicstaticBeanDefinitiongetProcessNoteRequestBeanDefinition(){29Class<?>beanType=ProcessNoteRequest.class;30RootBeanDefinitionbeanDefinition=newRootBeanDefinition(beanType);31beanDefinition.setInstanceSupplier(getProcessNoteRequestInstanceSupplier());32returnbeanDefinition;33}34}
As a result, we can see that we have the exact 3 things we've mentioned before:
A BeanDefinition for the UseCaseConfig class: getUseCaseConfigBeanDefinition.
A BeanDefinition for the ProcessNoteRequest class: getProcessNoteRequestBeanDefinition.
A supplier that instantiates ProcessNoteRequest: getProcessNoteRequestInstanceSupplier.
In a nutshell
Spring Ahead-of-Time Processing takes all the components that will be created and instantiated during runtime by Spring's magic and transforms them into plain Java configurations.
With this understanding, it's clear why Spring Ahead-of-Time Processing is so important for an application built with GraalVM. Without it, all the annotation-based configurations would need to be manually migrated to Java configurations by developers.
What is SAM and why do we need it?
The AWS SAM (Serverless Application Model) is a framework for building serverless applications within AWS, and it is essentially a subset of CloudFormation. Using SAM, you can define and configure all the necessary resources for the lambda, including:
Resource Configuration: Detailed configuration of resources, such as timeout, memory, ephemeral storage, concurrency, and more.
Triggers: Configuring triggers for the lambda, such as HTTP endpoints, SQS messages, SNS notifications, S3 events, etc.
Permissions: Configuring AWS permissions for the lambda by referencing existing IAM policies, IAM roles, and connectors.
Runtime: Specifying the runtime in which your code will run (e.g. Java 11, Python, Node.js, custom runtime, etc.).
Deployment: Handling deployment automatically by SAM, thereby eliminating deployment overhead. You just need to update your code and configuration, and trigger the deployment.
Note: SAM offers a nice feature that allows you to emulate the AWS Lambda environment locally for debugging and testing purposes using the sam local invoke command.
It's worth noting that SAM is based on AWS Lambda and is designed to simplify the process of building and deploying serverless applications. By using SAM, you can save time and reduce complexity, allowing you to focus on developing and refining your application's core features.
In a nutshell
SAM is composed of two components. The first is a Command Line Interface (CLI) that allows you to build, create, deploy, and delete Serverless applications on AWS. The second component is a YAML template that defines all the configurations your application consists of.
For example, in the template below, an AWS function is declared that is triggered by an SQS event:
AWS Lambda currently supports seven different runtimes, which are:
Java
Python
Node.js
.NET
Go
Ruby
Custom Runtime
Note: The Custom Runtime allows you to implement an AWS Lambda runtime in any programming language by following a simple specification.
The GraalVM native-image produces a binary executable file that is not supported by default runtimes. However, it is possible to run it using custom runtime. The custom runtime is already implemented as part of spring-cloud-function-adapter-aws, but understanding how it works can be helpful. Therefore, we will explore it further.
To create a custom runtime, you simply need to adhere to a straightforward specification that outlines how the runtime should interact with AWS Lambda. By doing so, you gain the ability to construct your runtime using your preferred programming language, which grants you a more flexible approach to constructing serverless applications.
The uploaded artifact should include a script called bootstrap, which serves as the entry point for our AWS Lambda function. This script will be executed to create the runtime.
Bootstrap script example:
1#!/bin/sh
2cd$LAMBDA_TASK_ROOT3./application
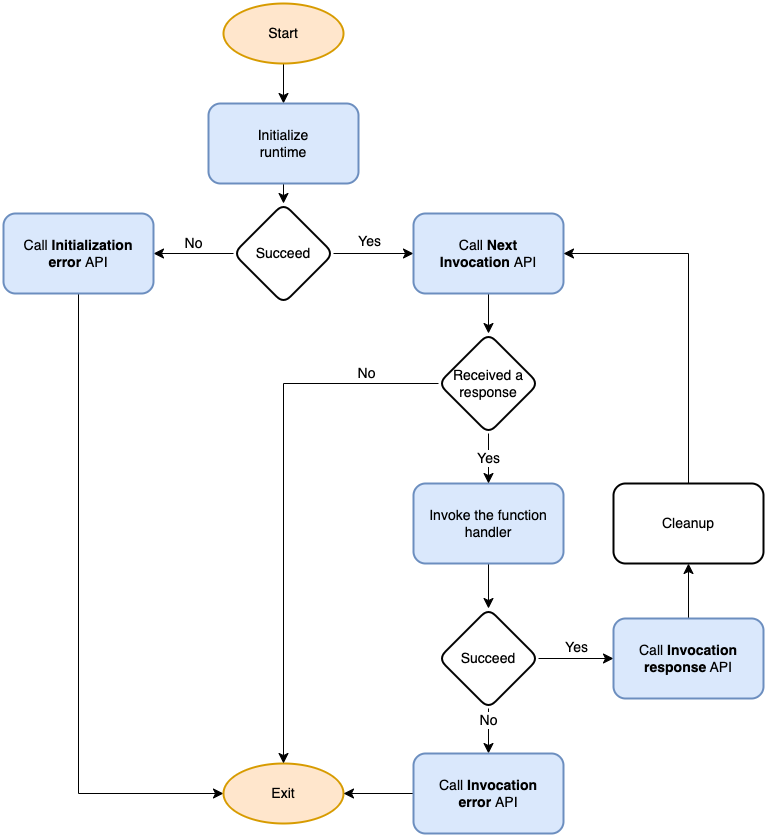
To visualize the flow, we can use this flow diagram (see explanation below)
When the application starts up, it needs to perform several initialization steps to ensure it is ready to handle incoming requests efficiently:
Load its configuration from environment variables: _HANDLER, LAMBDA_TASK_ROOT, AWS_LAMBDA_RUNTIME_API. More information on how to do this can be found in the documentation.
Initialize all heavy resources such as JDBC connections, SDK clients, etc. which can be reused across multiple invocations. This helps to avoid the overhead of repeatedly creating and destroying these resources with each request.
Create a global error handler that calls the Lambda's API and immediately exits (This is an essential step to ensure that any unhandled errors are reported to the Lambda's API, allowing the appropriate measures to be taken).
Once the initialization tasks are completed, the custom AWS Lambda runtime enters a loop to process incoming events. The following steps are executed during each iteration of the loop:
The runtime tries to retrieve an incoming event from the Next Invocation API. If there is no response, the runtime exits.
The function handler is invoked. If the invocation fails, the runtime calls the Invocation error API to report the failure.
The runtime returns a response by calling the Invocation response API.
After completing the invocation, the runtime cleans up all the resources used in the current iteration. This is important to prevent any resource leaks and ensure that the runtime is ready to handle the next incoming event.
Building an AWS Lambda with Spring Boot
To find the complete code check out GitHub repository, in this section we will cover only the main parts.
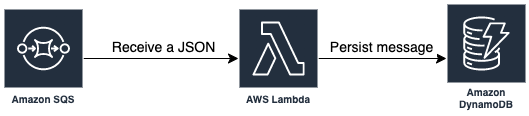
For this implementation, we will focus on a common use case where AWS Lambda is triggered by a message from Amazon Simple Queue Service (SQS), performs some business logic on the message, and then persists the modified message in Amazon DynamoDB.
Writing the code
To prepare the runtime for the AWS Lambda, we will need to add the following plugins to the project:
spring-cloud-starter-function-web provides the runtime for the function we'll be creating.
spring-cloud-starter-function-adapter-aws adjusts existing runtime and allows to use custom-runtime specification described earlier.
To define a lambda handler (which serves as the entry point to the application), a bean of type Consumer<T>, Function<T,R>, or Supplier<T> needs to be registered in the Spring context.
If we have multiple beans that implement any of these functional interfaces, the spring.cloud.function.definition property in the application.properties or application.yml file must be explicitly configured.
For the given use case where a Lambda function consumes an event from SQS and saves it in DynamoDB, the implementation should use the Consumer<SqsEvent> interface. Here, SqsEvent represents an SQS object that can contain from 1 to 10 messages.
The ReadSqsMessageBody implementation uses Jackson ObjectMapper to read String message body and convert it to a DTO object.
1@Component 2publicclassDefaultReadSqsMessageBodyimplementsReadSqsMessageBody{ 3 4privatefinalLoggerlog=LoggerFactory.getLogger(DefaultReadSqsMessageBody.class); 5 6privatefinalObjectMappermapper; 7 8publicDefaultReadSqsMessageBody(ObjectMappermapper){ 9this.mapper=mapper;10}1112@Override13publicPersistNoteRequestread(Stringbody){14try{15returnmapper.readValue(body,PersistNoteRequest.class);16}catch(JsonProcessingExceptionexception){17log.error("Failed to read value: {}",body,exception);18thrownewRuntimeException("Failed to process json.");19}20}21}
The SaveNoteRequest implementation applied some changes on provided DTO using RequestTransformer instance, and finally object is saved in a DynamodbDB table.
The classes mentioned above are quite simple and do not require any special code for the native-image. It's a typical Spring Boot application that we create regularly. This code is almost ready to be deployed to AWS Lambda runtime, but before that, we need to provide some reflection hints to GraalVM. This is because the following operations use reflection:
ObjectMapper is used internally by Spring Cloud Function to create SqsEvent and SqsMessage objects.
ObjectMapper#readValue uses reflection to access our DTO object PersistNoteRequest
The internals of DynamoDbTemplate#save also use reflection to persist our message Note.
To provide these hints, we can put all the details in a /META-INF/native-image/reflect-config.json file. Alternatively, we can use an annotation provided by Spring Boot, which is @RegisterReflectionForBinding, to provide a type-safe way of doing this. This is the last step we need to take, and the following code accomplishes it:
After these steps, our code is ready to be compiled into a native image that can be deployed to AWS Lambda runtime.
Configuring SAM (Serverless Application Model)
The main SAM file is template.yaml, which defines all the resources related to the Lambda function. Using SAM, we will define the following:
Custom runtime via Runtime parameter
An AWS Lambda function named EveryNotePersisterFunction
An SQS trigger for that function called SQSEvent
Build instructions via the BuildMethod parameter (this is necessary to guide SAM on how to assemble our application)
An SQS queue named MainSqs
A simple DynamoDB table with a PK named NoteTable
1AWSTemplateFormatVersion:"2010-09-09" 2Transform:AWS::Serverless-2016-10-31 3 4Globals: 5Function: 6Timeout:20 7Runtime:provided.al2 8MemorySize:256 9Architectures:10- x86_6411Tracing:Active# https://docs.aws.amazon.com/lambda/latest/dg/lambda-x-ray.html1213Resources:14EveryNotePersisterFunction:15Type:AWS::Serverless::Function 16Connectors:# <- This section grants permissions to Read and Write to the DynamoDB Table17NoteTableConnector:18Properties:19Destination:20Id:NoteTable21Permissions:22- Read23- Write2425Properties:26CodeUri:.27Handler:none28Events:29SQSEvent:30Type:SQS31Properties:32Queue:!GetAtt MainSqs.Arn33BatchSize:1034Enabled:true35Metadata:36BuildMethod:makefile3738MainSqs:39Type:AWS::SQS::Queue4041NoteTable:42Type:AWS::Serverless::SimpleTable43Properties:44TableName:note45PrimaryKey:46Name:id47Type:String
To provide instructions for SAM, we need to create a Makefile that will clean the build directory, compile the native
executable file, create the previously mentioned bootstrap script and place everything in the designated ARTIFACTS_DIR location.
The final step is to create a build environment for the Lambda function.
Since the build artifact will run in the Amazon Linux 2 operating system, we need to ensure that the artifact can be built and executed on provided.al2.
To do so, all build steps will happen inside a Docker container with the base image public.ecr.aws/amazonlinux/amazonlinux:2
Note: This file was generated by the SAM CLI and has been modified to make it easier to manage versions by exposing the GraalVM, Java, and Gradle versions as arguments.
Execute sam build --use-container command to build a deployable artifact. It will use the Docker container built in step 1 together with the Makefile created previously.
Now artifact can be deployed (Don't forget to replace <AWS_REGION> placeholder).
To test created lambda function, I found several options that can be applied separately or combined for different situations.
Using Integration tests with LocalStack and TestContainers (JVM)
To test our application, we can use old good unit tests or integration tests. However, since our application is not aware of the trigger, such as an SQS message, an API Gateway request, or an SNS notification, we won't be able to create a complete integration test. Fortunately, we can leverage Spring Cloud Function, which provides a utility class that emulates the APIs provided by Amazon for the lambdas with custom-runtime.
The AWSCustomRuntime can be useful for creating a complete integration test with AWS custom runtime. Additionally, we will need to use LocalStack to run DynamoDB locally and test the complete execution flow.
Before listing the steps of the test with AWSCustomRuntime, it is important to note a few important things:
We need to add AWSCustomRuntime to the application context.
We need to use a real webEnvironment since it is required by the AWSCustomRuntime.
We need to specify explicitly the function name (via spring.cloud.function.definition property) that will be used as a handler because AWSCustomRuntime defines additional beans that implement functional interfaces.
We need to provide a property with the key _HANDLER. This is necessary for the AWS adapter to realize that the CustomRuntimeEventLoop should be started.
With all of this in mind, we can create an integration test that will send an event to the CustomRuntime (which will later be pulled by our function), and we expect that within 5 seconds, we will have persisted the event in DynamoDB.
1@ExtendWith(DynamoDbExtension.class) 2@SpringBootTest( 3classes={Bootstrap.class,AWSCustomRuntime.class}, 4webEnvironment=SpringBootTest.WebEnvironment.RANDOM_PORT, 5properties={ 6"spring.cloud.function.definition=lambdaFunction", 7"_HANDLER=lambdaFunction" 8}) 9classLambdaFunctionTest{1011// Some setup and dependency injection1213@Test14voidTest()throwsIOException{15//Given16varsqsEvent=Files.readString(event);1718//When message is sent to custom-runtime, and it gets consumed by handler19customRuntime.exchange(sqsEvent);2021//Then item should be saved in database22await().atMost(Duration.ofSeconds(5)).until(itemSavedInDatabase());2324}2526privateCallable<Boolean>itemSavedInDatabase(){27return()->{28varitems=table.scan().items().stream().toList();29if(items.size()==1){30varsavedItem=items.get(0);31assertThat(savedItem.getId()).isNotNull();32assertThat(savedItem.getCreatedAt()).isNotNull();33assertThat(savedItem.getNoteBody()).isEqualTo("message body");3435returntrue;36}37//exact one item wasn't saved38returnfalse;39};40}41}
I would recommend using this approach as part of the quality check before deployment, which should be a part of the CI/CD process.
Run locally as a Spring Boot application (JVM)
Once the application is created, it can be run as a regular Spring Boot application. On startup, the created Lambda handler is exposed as an HTTP endpoint that can be invoked at http://localhost:8080/lambdaFunction. The lambdaFunction is the bean name which is used as the entry point for our application.
To emulate SQS message receiving, we can use the following curl call:
I would recommend using this approach when it comes to manual testing and debugging.
Test on AWS (native-image)
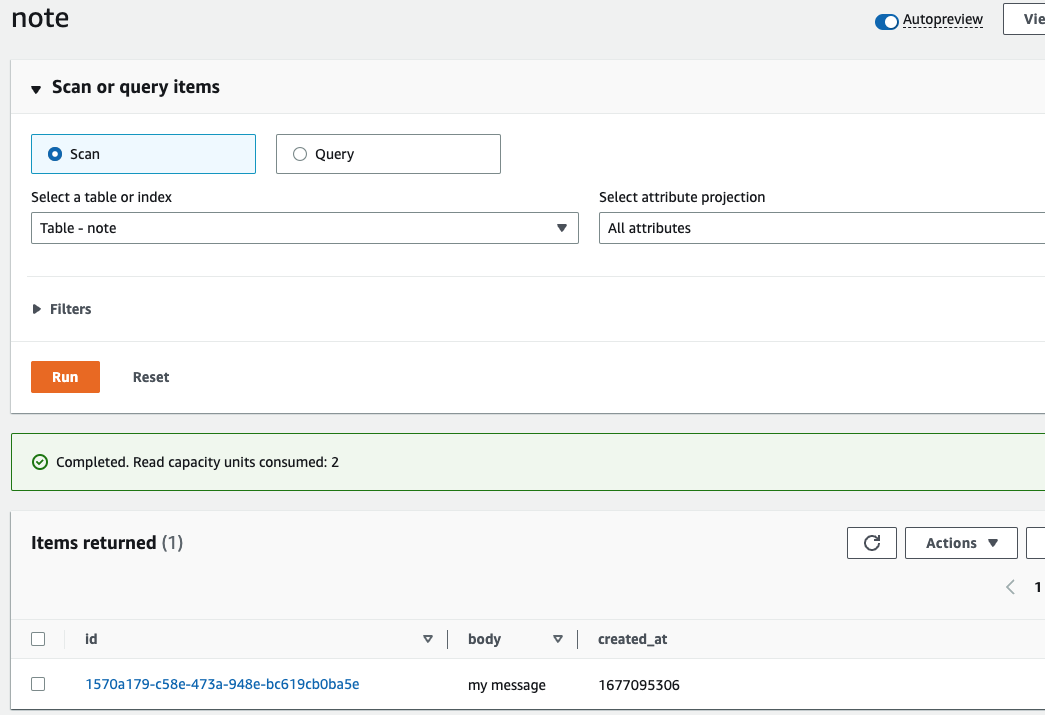
To test a deployed lambda, we can send a message to SQS since that is the trigger for the created lambda function. Afterward, we can verify the DynamoDB table to ensure that the message was saved.
Note: Don't forget to replace <ACCOUNT-ID> and <QUEUE-NAME> placeholders with values that correspond to your account and created queue name.
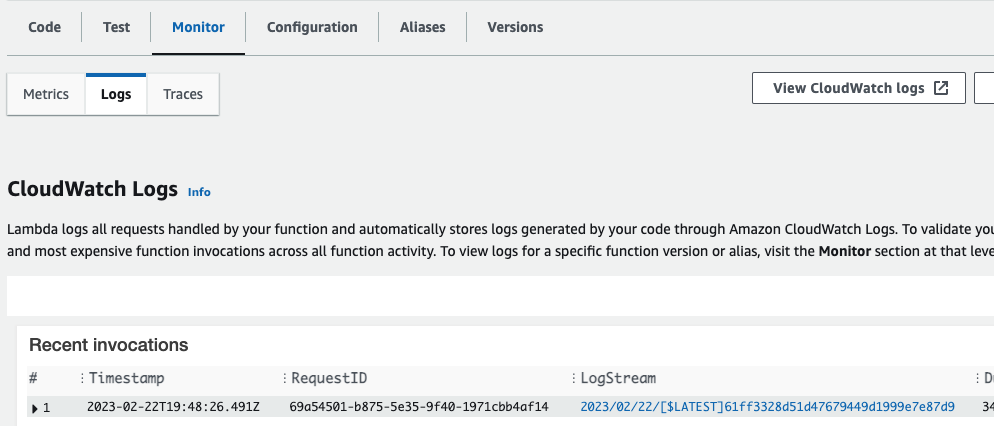
After that, we should check the Lambda's monitor tab to ensure that the lambda was executed successfully.We should also check that there is an entry in DynamoDB with the posted message.
I would recommend using this approach when we want to perform end-to-end (E2E) tests in a pre-production account or to perform load/performance tests within a real AWS environment, all these steps can be automated and also introduced as part of CI/CD.
It's time for automation (GitHub CI/CD workflows)
We all like to be lazy and delegate our work to someone else, so let's delegate the building, testing, and deployment to a GitHub workflow.
Note: The workflows described below are pretty simple and can be adjusted based on your requirements.
I've created two workflows.
The first one is triggered when a pull request is opened, and GitHub Actions will try to build our application, run tests, and finally build a native executable using SAM:
1on: 2pull_request: 3branches: 4- main 5jobs: 6build_and_test: 7name:"Build and Test" 8runs-on:ubuntu-latest 9steps:10- uses:actions/checkout@v31112- uses:actions/cache@v213with:14path:|15 ~/.gradle/caches
16 ~/.gradle/wrapper17key:${{ runner.os }}-gradle-${{ hashFiles('**/*.gradle*', '**/gradle-wrapper.properties') }}18restore-keys:|19 ${{ runner.os }}-gradle-20- uses:actions/setup-java@v321with:22distribution:'zulu'23java-version:'17'2425- name:"Gradle Build"26run:./gradlew build -x test2728- name:"Gradle Test"29run:./gradlew test3031sam_build:32name:"Build using SAM"33needs:build_and_test34runs-on:ubuntu-latest35steps:36- uses:actions/checkout@v337- uses:actions/setup-python@v438with:39python-version:"3.8"40- uses:aws-actions/setup-sam@v24142- name:"build image if missing"43run:|44 if [[ "$(docker images -q al2-graalvm:gradle 2> /dev/null)" == "" ]]; then
45 echo "Image not found. Building image."
46 ./build-image.sh
47 else
48 echo "Image found. Skipping build."
49 fi50- run:sam build --use-container
The second workflow gets triggered when a merge occurs on the main branch. It will assume an IAM role, build the native-image (this step can be improved by caching the artifact from the previous step to reduce execution time), and finally deploy our serverless application.
Note: Before running this workflow, please ensure that you have completed the following steps:
Create Secrets for GitHub Actions with AWS_REGION and AWS_ROLE which have sufficient permissions to create all resources defined in template.yml.
Configure the OIDC provider to allow GitHub to assume the IAM role without any AWS credentials. Alternatively, you can use AWS_ACCESS_KEY_ID and AWS_SECRET_ACCESS_KEY
Verify that the role/user you are using for deployment has sufficient permissions. For testing purposes, you can use AdministratorAccess, but it's better to configure a fine-grained IAM policy. You can find more details on how to do this here: https://sst.dev/chapters/customize-the-serverless-iam-policy.html
1on: 2push: 3branches: 4- main 5 6permissions: 7id-token:write 8contents:read 9jobs:10deploy:11runs-on:ubuntu-latest12steps:13- uses:actions/checkout@v314- uses:actions/setup-python@v415with:16python-version:"3.8"17- uses:aws-actions/setup-sam@v218- uses:aws-actions/configure-aws-credentials@v119with:20role-to-assume:${{ secrets.AWS_ROLE }}21aws-region:${{ secrets.AWS_REGION }}2223- name:"build image if missing"24run:|25 if [[ "$(docker images -q al2-graalvm:gradle 2> /dev/null)" == "" ]]; then
26 echo "Image not found. Building image."
27 ./build-image.sh
28 else
29 echo "Image found. Skipping build."
30 fi3132- run:sam build --use-container33# Prevent prompts and failure when the stack is unchanged34- run:|35 sam deploy \
36 --no-confirm-changeset \
37 --no-fail-on-empty-changeset \
38 --resolve-s3 \
39 --region ${{ secrets.AWS_REGION }} \
40 --capabilities CAPABILITY_IAM \
41 --stack-name every-note-persister
Conclusion
In conclusion, building an AWS Lambda using Spring Boot 3 GraalVM native image can provide significant benefits, such as
improved performance and reduced cold start times. By leveraging custom runtime, Spring AOT, SAM, and GitHub actions,
developers can streamline the process of deploying and testing their serverless applications.
Using code examples, diagrams, and fine-grained configurations can help developers understand the details of building and
deploying an AWS Lambda using Spring Boot 3 GraalVM native image. Additionally, referencing relevant resources and
documentation can provide valuable insights and best practices for developers looking to build scalable and efficient
serverless applications on AWS Lambda.
Overall, the combination of Spring Boot 3 GraalVM native image and AWS Lambda provides a powerful platform for developing
and deploying serverless applications. By following the steps outlined in this blog post, developers can quickly and easily
create high-performance and scalable serverless applications using modern technologies and tools.
Thank you for taking the time to read this blog post. I hope you found it informative and helpful in your journey of building
AWS Lambdas with Spring Boot 3 GraalVM native image.
Be sure to stay tuned for future posts, and I look forward to connecting with you again soon.